How to Optically Polish Aluminum
There are two methods for optically polishing aluminum - knowing the right one for your project will save you time and money.
#basics #FAQ
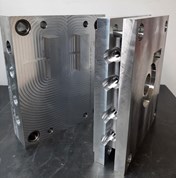
A perfect example to illustrate the two different methods for optically polishing aluminum would be headlight prototypes. The first job is an optically polished "test block." A test block is made in order to prove the optical prescription before a complete working prototype tool is built. This particular mold produces the multiple faceted reflectors that curve around from behind the light bulb commonly seen inside most new headlights these days. The test block is built exactly as a finished piece that the mold would produce, and has to withstand the same rigorous inspection that any new headlight assembly would. This test demands a contour lapping technique with both stones and diamond polishing in order to preserve the contours and the sharpness of all of the edges a multifaceted reflector would have - even radii of .002" or less on edges required as sharp can affect the proper light diffusion.
The second method of optically polishing aluminum is used for smooth open surfaces as in the case of the clear polycarbonate lens that covers a headlight. The primary difference between the two methods is in the polishing stages. Stoning is basically the same for both, except that the changing inside curves on 14 differently-shaped prisms occurring on different levels in a 5" x 3" oval reflector are much more demanding to flat contour stone than the single curved clear lens that covers the headlight. But even so, the stoning technique is basically the same. It is the polishing stages that are completely different due to all of the trapped inside corners of a multifaceted reflector. The diamond brushing and buffing in those corners would destroy the optical prescription - leaving a series of lapping stages as the only alternative - while the clear curved lens can easily be brushed and "microlapped," and is the technique that is considerably easier to learn and produce.
Featured Content
Both methods, when properly done, produce a "liquid black" finish. In other words, the finish is so black in color that the aluminum no longer looks like metal but like a black liquid. However, it is this second, easier method of polishing aluminum that this article will address.
Stoning
The first step - as always in polishing - is to determine the depth of the existing tool scratches and to consider the shape of the finished contour. It is these two factors that determine which stone to use. This particular shape is an oval core in aluminum, approximately 3" x 5", that will make a clear lens to cover a multifaceted reflector. The top surface of the core is curved spherically round - highest in the center and dropping off gracefully at the ends. The cutter marks are quite good, averaging about .0007" from a CNC machine using a ball cutter. So a new 320-grit stone - especially designed for aluminum - is used.
That the contour is all one radius dictates that flat contour stoning this cavity and core is mandatory, as opposed to chisel stoning, which would guarantee both ripples and a wavy "fun house mirror" finish. A 400-grit stone might be considered the stone to start with, but experience has proven that it's far faster to go slightly coarser and back off on the downwards hand pressure than to go finer and press harder on the downwards pressure. Otherwise, time wasted by restoning at the end is a real possibility.
New stones developed for all non-ferrous metals work incredibly well and are available from a variety of vendors. Practice tests should be made to find the manufacturers whose type works best for you. These stones should always be used with mineral spirits. Lubricant and oils of any type should be avoided, as even tiny amounts will clog these stones, rendering them useless.
Contour dressing is critical and must be done to protect the geometry of the part. In this case, 220-grit sandpaper is laid down on the top of the core and the flat stone is carefully rubbed by hand into the sandpaper until the contour is transferred completely into the stone. Now flat stoning can begin.
Using a profiler set to a .060" stroke, the stoning begins by using enough downwards hand pressure to quickly remove 80 percent of the cutter marks uniformly across the entire core. Don't let any one area get more scratch marks out than another or you can lose control over your dimensions. Removing the scratch marks evenly guarantees accuracy in the finished product. Once 80 percent of all the tool marks are out, turn the block 30 degrees and continue flat stoning with a lighter downwards hand pressure.
You are looking for three things to happen at once. First, the deeper scratches you just made rough stoning should easily show up as scratch lines in the old direction. Second, the remaining tool marks should still be evenly disappearing across the entire block and third, as the last of all the scratches and cutter marks disappear, your downwards hand pressure should be light enough to produce the finest scratch of which the stone is capable. The secret to polishing is that amateurs deal with whatever scratches a stone gives them, but professionals use stones with varying hand pressures and crisscrossing to identify and create the types of scratches they want to have.
Professionals consciously create scratches that are easy to work with. They control the stone finish and leave nothing to chance. That is why a professional takes 30 to 60 percent less time to polish a job than an amateur - an amateur is just working hard instead of smart.
Once the 320 stoning is as fine as can be achieved - which should be a 500-grit finish and a completely scratch free satin finish - then 600 grit stoning begins and is completed in the exact same fashion. In fact, all polishing steps are completed in this exact same fashion of pressing down only as hard as 80 percent of the existing scratch marks require; constantly crisscrossing to find deeper marks and eliminating them; and lightening up to end with the finest scratch the process can produce. This is true regardless if you are 320 stoning, 600 stoning, brushing with diamond, lapping with wood or buffing with felt.
Professionals always press down only as much as is needed to remove 80 percent of the scratches and lighten up on their downwards pressure until they are creating the finest scratch obtainable. Only then does a professional move on to the next polishing step.
True optic polishers will all agree that a satin stone finish in the 900 grit range - about five to nine microns in depth - is critical for a perfect optic polish result. Brushing with diamond always ruins the contour of the metal and the more you brush the more you will ruin. Unfortunately, these new aluminum stones stop at 600 grit - which will require too much brushing.
However, the answer to this problem is easy. After the 600-grit flat stone is as fine as you can get it, take the flat stone by hand and add a small dab of 15-micron natural diamond. Go over the entire surface with the stone, diamond and mineral spirits with gentle massaging strokes. By stoning the surface gently with natural diamond and mineral spirits, the polisher can get a five- to nine-micron finish as the diamond wears out. This unlikely step is critical to getting the range of surface scratches up to the proper consistency of depth for easy brushing on soft aluminum while protecting the contour of a very critical aluminum part. Be sure not to finish with a micro-fine diamond stoned finish and risk destroying everything.
Brushing
All brushing ruins the finish. Regardless of whatever some other polisher might say, this is absolutely true. Over-brushing - and therefore overworking the metal - ruins the final finish every time. Ripples and "fun house mirror" finishes are also multiplied by over-brushing when proper stoning should have been used instead. This is especially true on soft aluminum. Brushes with a short length and stiffer bristles cut faster but also create more heat and surface tension than do brushes with longer or full-length bristles. For this properly stoned aluminum core, a one-inch nylon bristle cup brush trimmed down to 1/2" length bristles used with nine-micron natural diamond is perfect for easily brushing out a five- to nine-micron, scratch- free, satin stone finish.
Using natural diamond for aluminum optic polishing will consistently yield the highest results in liquid black appearance and conservation of the contour. When brushing, begin with nine-micron diamond, a one-inch diameter nylon bristle cup brush that has the bristles trimmed down to 1/2" length and denatured alcohol. Do not use mineral spirits as they thin the diamond paste and result in overly aggressive cutting - leading to deep brush marks in the aluminum. Instead, use denatured alcohol whenever brushing or buffing is required for all optic polishing in aluminum or steel. Once the brushing has crisscrossed itself out and is as fine as possible, the liquid black color should already be visible. Look for any imperfections in the reflected light as you move your head from side to side. Any blip or squiggle in the reflection shows the location of a flaw in the flatness of the contour's surface. If microlapping doesn't remove this flaw, then reflat stoning is required.
Buffing
Buffing occurs in two steps. First, a hard felt buff is impregnated with three-micron diamond until the bottom glistens black. Then some denatured alcohol is squirted onto the aluminum. With the bottom of the buff only - never use the sides of a felt buff, as this guarantees that deep scratches will be cut into the finish - press down only hard enough to buff smooth the entire surface. This hard buffing will erase any imperfections in the surface such as remaining stone marks or brush marks. This microlapping will even help fix mistakes in flatness depending upon the skill of the polisher.
Once you achieve as fine a finish as possible, step two - soft buffing - can begin. At this point the polisher is no longer polishing, but only adding depth and gloss to the liquid black micro finish. The bottom of a soft buff is impregnated with three- or one-micron diamond until the bottom glistens just like the hard buff. Again, only use denatured alcohol as the lubricant and buff out the finish until it is as fine as possible. Anyone who stubbornly buffs with mineral spirits and has gotten to this point has just realized they've got a mess on their hands which can only be solved by more buffing, Don't overwork the surface and never brush or buff with anything other than denatured alcohol and you'll save yourself a lot of trouble at the end.
Once you have lightened up on your downwards hand pressure until the soft buff finish is as fine as possible, it is then time for the final step of rubbing the finish out by hand.
Rubbing out by hand
The final step is to eliminate all traces of buff marks - leaving only a perfectly clear liquid black finish. This is easily accomplished by making a one-inch, six layers deep square of high quality facial tissue and putting a dab of three- or one-micron diamond on it. Then dampen it slightly with denatured alcohol and very gently rub the surface in two-inch strokes or less, exactly as if you were waxing a fine vintage car.
Don't give in to temptation and press harder to get out certain buff marks and don't use strokes longer than two inches or scratching the surface becomes a real possibility. You might be forced to press down harder in some areas, but do so reluctantly, as a few extra minutes rubbing by hand is faster than going all the way back to a hard buff to get out a mean scratch. It also is helpful for you to be in as clean a room as possible when buffing, as grit constantly falls from the air in most shops and loves to put deep scratches in optically polished surfaces. Also be sure that your light fixtures are clean before buffing, as this one source accounts for more than half of all dust contamination.
Once hand rubbing is complete, wash off everything with more denatured alcohol and soft tissue.
Working Smart
All brushing does damage, so proper stoning is essential for professional optic results. The greatest secret of all - which few polishers are even aware of - is that you must vary the amount of downwards hand pressure whenever necessary and then lighten up your pressure until you polish out your own scratch marks. Only then can the polisher move on to the next step, whether it be another stone or a switch to brushing, buffing or rubbing out by hand. Remember, the step that you are on now must be as fine as possible before moving on to the next finer step. In this way you will save 30 to 60 percent of the time it takes to polish every job. It's all about working smarter instead of harder, of working at maximum efficiency or maximum struggle. Working smarter is better.
RELATED CONTENT
-
Corrosion Control: A Guide to Proper Mold Care
If you have not set up a proactive mold maintenance program, your facility runs efficiently only until the next major problem or repair.
-
The Ins and Outs of Hot Runner Temperature Control
A training checklist that explains the why and how of proper hot runner temperature control and system management.
-
How to Use Flushing to Clean Cooling Passages and Heat Exchangers
Six key questions to ask before investing in a flushing system.


