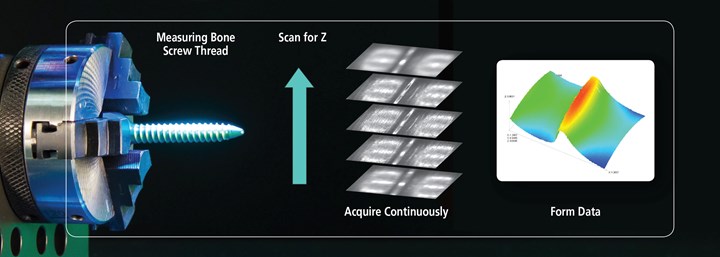
Optical 3D imaging detects the peak of each pixel’s contrast from the continuously changing image data. Focus image stack technology stitches images together within the high-resolution Z-axis data across multiple fields of view. Photo Credit, all images: Mitutoyo America Corp.
From delicate contact lenses to new, feature-rich components for electric vehicles, the molds for mass producing plastic parts must be precisely measured and inspected to avoid errors, waste and production delays. The need to streamline this labor-intensive process is driving a convergence of shopfloor automation and quality control with the latest advances in metrology, especially next-generation vision measuring technology.
The application of a vision measurement solution — whether a dedicated vision machine or a coordinate measurement machine (CMM) equipped with cameras or a laser probe — depends on mold size, clearance and weight, as well as the type of surface to be measured. Dedicated vision machines do a faster job of measuring and inspecting smaller, lightweight molds with minute clearances and features, or surface finishes that would be damaged if touched. Molds for contact lenses and catheter tubes in the medical industry are good examples. Conversely, a CMM equipped with both standard and vision measurement tools would lend itself well to larger, heavy molds with more durable surfaces.
Featured Content
A basic vision measurement solution could be a CMM with a camera instead of a touch probe to provide noncontact inspection of the mold halves and the parting lines to catch mismatches that could cause leaks or breakage of the part. For manufacturers that need a more advanced view of the entire mold, however, more sophisticated, dedicated vision machines with a laser dot or chromatic position sensor can scan the entire mold inside and out without damaging any small or intricate features or surfaces.
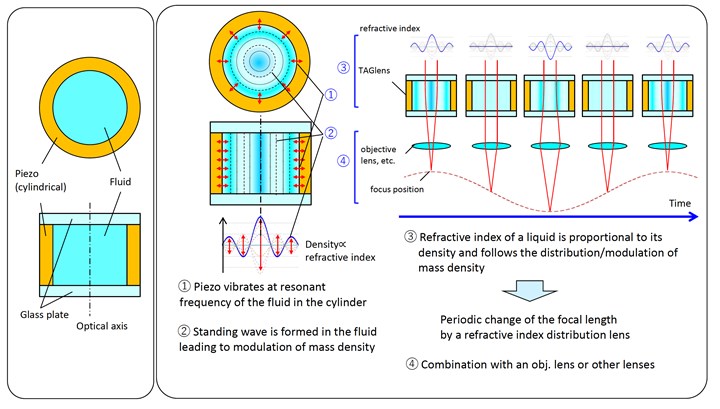
New TAG technology delivers highly accurate “near and far” vision measurements at high speeds in manufacturing environments. This results in fewer focus adjustments to the vision system on the factory floor because the liquid lens can automatically generate the correct configuration for the specific type of inspection.
Three Advances Happening Now
If vision measurement and inspection technology for moldmaking is the right match for your shop’s automation processes, here are three evolving advanced capabilities to consider. Each one supports the joining of vision measurement with shop automation in terms of time savings, improved error detection, quality control and reduced waste.
-
Optical 3D Scanning (PFF)
Optical 3D scanning, called Points from Focus (PFF), is a three-dimensional optical data collection system featuring a camera that can capture point data in multiple fields of view (FOV) by focusing through stacked images. As a result, optical 3D scanning enables the camera to produce a low-cost, three-dimensional scan of the mold without adding another sensor.
Intuitive software enables users to easily stitch together multiple FOVs, focus on data points in individual regions and automatically adjust the lighting during the scan to capture the maximum number of data points per FOV.
Mold manufacturers benefit by expanding their measurement capabilities beyond a simple picture of the parting line to a more detailed, multi-point inspection of the line and the entire mold. Plus, errors can be caught early in production, resulting in fewer production delays and reduced waste.
As a vision technology for measurement and quality inspection, PFF on a vision machine can reduce costs while delivering a typical single FOV in less than seven seconds and capturing up to 300,000 points per FOV. In addition, this optical data collection technology easily converges with shopfloor automation systems by fulfilling the need for fast, noncontact scanning on various components and surfaces, including small molds with intricate features and delicate surfaces. That makes PFF an ideal system for measuring molds used to manufacture medical devices, contact lenses and products across multiple industries.
Liquid lens technology enables mold manufacturers to have a “near and far” vision system that operates at the high speeds of shopfloor automation.
-
Liquid Lenses
With vision systems, it is often difficult to quickly select the right lens configuration when needed on the shop floor. Liquid lenses are designed for noncontact, ultra-high-speed vision inspection systems and deliver high optical performance even in harsh industrial environments. They can be mounted on robotic arms in an automated factory or assembly line, and their high-speed focusing systems can withstand a large amount of vibration and shock. In addition, these lenses are unique in that they can create a large depth of field by applying sound waves to the liquid contained in the lens.
Liquid lens technology enables mold manufacturers to have a “near and far” vision system that operates at the high speeds of shopfloor automation. That makes fewer focus adjustments to the vision system on the shop floor because the liquid lens can automatically generate the proper configuration for the specific type of inspection. They also can generate imaging depth-of-field capabilities up to 20 times greater than similar microscopy inspection systems, which reduces the time needed for mold manufacturers to inspect parts with complex geometry.
Instead of passing the mold to a different piece of equipment or human worker to inspect with a microscope or camera after measuring, vision machines with AI defect detection can measure and for defects.
- AI Inspection and Defect Detection
Artificial intelligence (AI) is at the core of shopfloor automation. It is now being adopted in metrology, where some vision measurement machines can now include AI inspection and defect detection software. So, instead of passing the mold to a different piece of equipment or human worker to inspect with a microscope or camera after measuring, vision machines with AI defect detection can measure and look for defects.
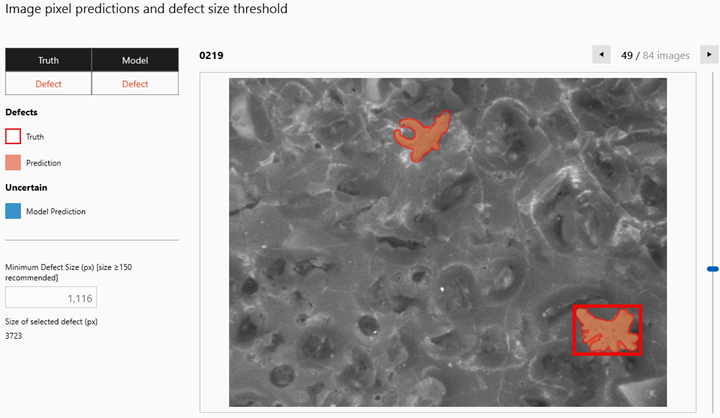
AI defect detection software “learns” to recognize a range of defects from images of molds loaded into the system to distinguish good parts from bad automatically.
The AI defect detection software “learns” to automatically recognize a range of defects from images of molds loaded into the system to distinguish good parts from bad. For example, AI cameras on the shop floor may determine that a mold diameter is correct, but there is also a scratch on the mold that will cause it to fail. The AI defect detection capability will catch any mold manufacturing errors before they escalate further into production, thus reducing waste and production delays. AI defect detection also eliminates human error as it is difficult for human inspectors to regularly recognize flaws on potentially thousands of molds.
With exciting technologies for vision measurement and inspection machines evolving and currently under development — and the ability to add new vision tools to multi-sensor CMMs — mold manufacturers have various options to fit their production needs, both now and in the future.
RELATED CONTENT
-
How to Correctly Size a Hydraulic Cylinder
This week Randy shares steps for correctly sizing a hydraulic cylinder on a mold.
-
A Different Approach to Mold Venting
Alternative venting valves can help overcome standard mold venting limitations and improve mold performance.
-
7 Key Advantages of Hot Runner Systems
While both hot runner and cold runner systems have their benefits, for design flexibility as well as reduced cycle times and costs, hot runner systems will probably be the better choice.


