A mold design almost always involves a certain amount of compromise. The part design may include features that could make the mold either difficult to construct or difficult to operate. So, the part designer, the molder and the moldmaker need to do the best they can to resolve areas of conflict or disagreement, and this usually requires compromise. It is the same with robots and automation.
moldmaking with automation in mind
There are eight specific areas of mold design during which the right decision can avoid problems for the robot or automation supplier and possibly save money on the purchase, installation or operation of the equipment. But compromise is always going to be necessary, so each of the following tips can be read with the assumption that they are preceded by the phrase, “If possible.”
Featured Content
1. Do not place inserts on the same side of the mold from where parts will be removed.
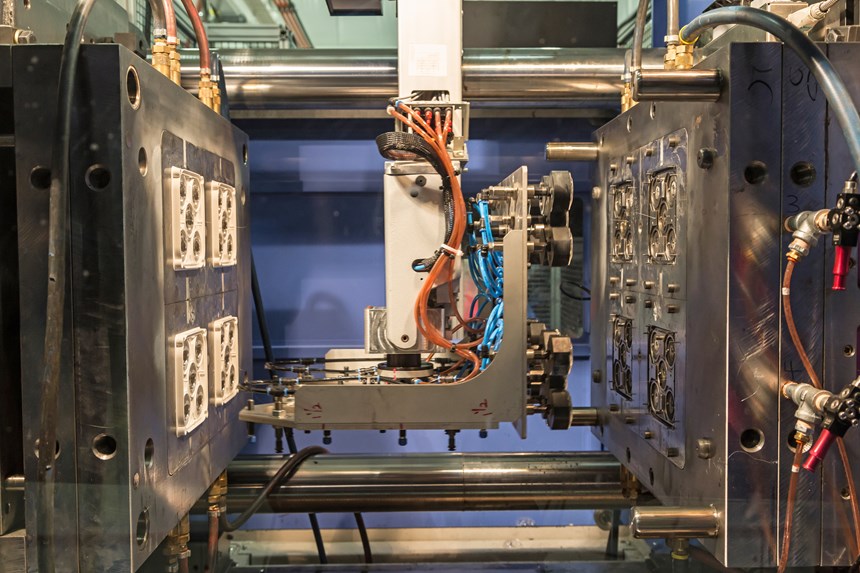
When the molded part requires inserts, it is always better to design the mold with the inserts positioned on one side of the mold and the parts retained on and removed from the other. This approach permits insert and part grippers on opposite sides of the robot’s vertical arm and avoids problems.
For example, when an insert, part and grippers are on the same side of the end-of-arm tooling (EOAT), the robot must grip the parts and then shift either vertically or horizontally to place the inserts. These extra motions add complexity and cost to the tooling.
Also, the EOAT needs more area to accommodate the two operations on one side. However, when the EOAT is larger (press tie-bar spacing typically determines robot size), it gets in the way of the machine tie bars or with the robot itself. This situation requires the robot to be mounted in an offset position, which in turn may need more beam length, resulting in higher costs.
Also, when all the tooling is on the same side of the arm, there is an uneven weight distribution that can challenge the payload, torque and inertia restrictions on the robot, which means more compromises on the tooling. The EOAT weight should be evenly distributed on opposite sides of the arm.
2. Avoid mold-locked parts.
Robots are not designed to physically pull a part off of a core or out of a cavity, as that movement places undesirable stress on the grippers and the arm. Avoid any mold lock or undercut, so when everything is working properly, the mold ejector system will start pushing the part out of the mold, and the robot only needs to grab the part and extract it from the mold. Some robots on the market have features that allow a robot arm to move as the ejectors push the part away from the mold.
If the molded part has a significant undercut or is locked behind a mold component, the EOAT will need a secondary mechanism that can lock onto the mold and part, so that an actuator (ejector) can pull the part free. This, of course, increases tooling cost, adds weight (that the robot must handle) and lengthens cycle time. A molder/mold builder can avoid these results if they design the mold with slides that eliminate mold locking.
3. Design the mold, so it shuts off on the inserts.
A robot is not designed to take an insert to a hard stop or to seat the insert in a position on the mold because these movements put unnecessary stress and wear on the robot. Instead, position inserts at a mold shutoff, so the mold closing pushes the insert into its final position. This is a simple way to ensure that the insert(s) cannot slip out of position due to machine vibration or material flow.
And, if the insert is going to be placed on a locating pin, make sure you allow a generous lead or bullet nose on the pin. Using a short, sharp mold pin makes it more difficult for the robot to place the insert properly. Using a long pin with a generous chamfer will simplify the programming needed to move the insert into its proper position.
4. Watch what you put on top of the mold.
A robot contributes immensely to shorter cycle times, increased productivity and profitability simply because it removes parts much faster and more consistently than a human operator. However, the robot must get in and out of the mold space as quickly as possible. A molding machine that must wait an extra fraction of a second for a robot to get out of the way will increase costs over time.
The key is to minimize the amount of gear on top of the mold, such as electrical boxes, water lines, or even slides or unscrewing actuators. If possible, mount this extra ‘stuff’ on the side of the mold, so it does not interfere with the robot as the mold closes.
5. Pay attention to gating.
All other things being equal, robot manufacturers will always prefer to automate a hot runner mold. The robot cycle is shorter (less time spent outside the mold) since there are no additional operations needed to separate parts from the runners, which is important for a fast-cycling part where the robot cycle time could be a limiting factor. The EOAT can be much simpler, too, since gripping and degating the runner will not require additional components.
Cold runner subgate or tunnel gate systems are the next most automation-friendly approach since degating is accomplished by the mold opening or by the ejection system. The robot only needs to pick the parts as they eject, and the runner simply falls out of the way, or more commonly, the robot picks both parts and runners and deposits them separately.
Problems arise with edge-gated molds because they require a mechanism to remove parts from the runner system, such as cutters on the EOAT (adding cost and complexity) or a degating fixture outside of the mold (adding a secondary operation and extending overall robot cycle time).
If edge gates are necessary, position the gates so there is room for a cutter to get in and cleanly sever the runner near the part’s surface. Otherwise, you may need to leave a small section of the runner/gate that requires removal via a secondary operation.
However, sometimes edge gates can offer an advantage in automation. For example, when the robot is not allowed to touch the part. In these cases, the robot grips only the runner system upon ejection, and the parts remain attached until they are outside of the mold when they can be clipped onto a conveyor or other device for proper handling.
6. Locate left- and right-hand cavities.
Often parts must be molded in two opposite-handed configurations in the same mold. When two parts are molded in a four-cavity mold, it is common to see the like cavities positioned diagonally to one another. For example, one left-hand part is molded in the upper left corner of the mold and the other in the lower right corner with the right-hand components in the other corners. This approach is used to balance material flow or to simplify gating, but it does create problems when it comes to automation.
For example, once the parts are removed from the mold, most customers want like parts to stay together with left-hand parts placed on one side of a conveyor and right-handed parts on the other. If the parts come out of the mold diagonally opposite one another, this is either not possible or requires more complicated automation with multiple wrist rotations. Whenever possible, keep like-handed parts on one side of the mold to ease positioning after removal.
7. Use mold locators.
Be generous in the use of mold-locating features. A center sprue bushing is enough to center the mold on the platen, but even a torpedo level is not accurate enough to ensure the mold is perfectly plumb and level. If a mold is not remounted exactly the same way every time, it may be necessary to reprogram critical robot positions to ensure proper operation, or you may need to reposition the mold. In either case, these adjustments increase mold changeover time and impact productivity.
8. Design the sprue and runner with gripping in mind.
In most cases, the robot is going to need to grip not only the parts but also the runner. So, the moldmaker must include features in the sprue/runner system that the robot can grip. Options can be as simple as using a one-inch-long sprue or building one or more vacuum pads (half-inch circular pockets along the length of the runner), which are inexpensive vacuum cups on which the EOAT can latch. Although both options yield a nominal increase in runner material waste, molders will see the return on investment in reliable runner removal.
Robot manufactures are equipped to develop a solution for almost any mold, so don’t view these eight tips as absolute. However, the customer ultimately reaps great benefits when a mold builder understands how they can impact automation design and implementation for the automation supplier.
RELATED CONTENT
-
What Is Scientific Maintenance? Part 1
Part one of this three-part series explains how to create a scientific maintenance plan based on a toolroom’s current data collection and usage.
-
Milling and EDM Automation Reshape Summit Tooling’s Mold Operations
Summit Tooling President Dan Martin credits the capability to run unattended machining 24/7 to the partnership that his company built with Makino.
-
Predictive Manufacturing Moves Mold Builder into Advanced Medical Component Manufacturing
From a hot rod hobby, medical molds and shop performance to technology extremes, key relationships and a growth strategy, it’s obvious details matter at Eden Tool.


